Thursday, August 25, 2011

Baking Bread and Saving Cash

I have fallen in love with baking my own bread again.  I found a fairly simple bread recipe and then turned it in to the simplest, most versatile, quick, no fancy machines required bread recipe.  With my recipe, I have made french bread, calzones, and dinner rolls.  I have no doubt that this bread could also be used as pizza crust, sandwich bread, sweet bread--monkey bread, cinnamon rolls, etc.
All you need to make this bread, is a bowl, a spoon, a 1 cup measuring cup, a 1/2 teaspoon measuring spoon, piece of plastic wrap, a baking sheet, and an oven.
Ingredients
1 1/2 teaspoons yeast
2 teaspoons sugar
1 1/4 cup warm-hot water
1 teaspoon salt (I've forgotten to add this on occasion and it still turns out well)
3 1/2 cups flour+about 1-2 tablespoons for the baking sheet (I use King Arthur All Purpose flour)
1-2 tablespoons olive oil (I don't measure this, just pour some in)
How To
In a large bowl add the yeast and sugar (the yeast feeds on the sugar--my kids LOVE watching this) and the warm-hot water.  Stir it around a bit and let it sit for 3-10 minutes.

Next add the flour and salt and some olive oil. 

Use that spoon again to mix it all up.  I don't use the spoon too long, just to start pulling it all together. 

Then use your hands to mix/knead the dough in the bowl for a minute or so. Form a large ball with the dough.
 At this point you can either spray the ball with some olive oil or brush some olive oil on using your hands. Then take your piece of plastic wrap and cover the top of the bowl.
Now leave the bowl in a warm spot for about an hour.  I stick mine in the oven with the light on.  Take a minute to wash your spoon, measuring cup, and measuring spoon, then prep your baking pan--just toss a bit of flour on there and shake it around. 
This pan has too much flour on it, but it was also the second time for me to use it to bake the bread that day.
 Then read a magazine, fold a couple loads of laundry, pick the kids up from school, prep dinner--you know, however you want to spend an hour. Then after an hour check out our bread dough...
It has pretty much doubled in size.  Also, smell that yumminess!  DON'T THROW AWAY YOUR PLASTIC, just fold it in half so you can use it again in a few minutes. Now you have to decide what you want to make with your bread dough.  This time I made 2 French loaves that we cut in half for meatball subs.
Divide the dough in two (if making rolls, this dough makes 12-15 dinner rolls) and stretch it out and dust it with a bit of flour from the pan.  Then loosely roll each loaf piece and tuck the seam under the bottom.
If you want to be fancy, cut a few slashes in the top of each loaf, and brush with a beaten egg to have the bread brown up during the cooking.  I don't do this because I like to use my eggs for other things--scrambled eggs, french toast, omelettes, other baking.
Cover the loaves (I don't always do this covering step) with your piece of plastic (I do save my plastic folded in 1/4s so that I can reuse it several times since for me it never touches the dough).  Let the dough rise on the baking sheet on the counter a second time.  This time though the rise time is only 20 minutes.  I don't always let it rise for the full 20 minutes and it still turns out just fine.
While the bread is going through this second rise, heat the oven to 375.  Bake the loaves for 20 minutes.  I cook the smaller dinner rolls for 15-17 minutes and the calzones for 20-22 minutes.  Just watch your bread.
These loaves are a little light, but I needed to go pick the boys up from school.  What I did to brown them up some was turn the oven off and put them back in while I was gone.  They turned out beautifully and tasted fabulous.
This bread is so cheap and easy to throw together and as a bonus it is dairy free! (I'll have to play with it to see if I can make it gluten free too.)  Give it a try.

Wednesday, August 24, 2011

First Day of School 2011

The boys have now completed their first week of school, Alexander in 3rd grade and John Paul in Kindergarten.  It's about time I get some pictures from that big day on here :)
Here they are together just outside the school, ready to walk in.

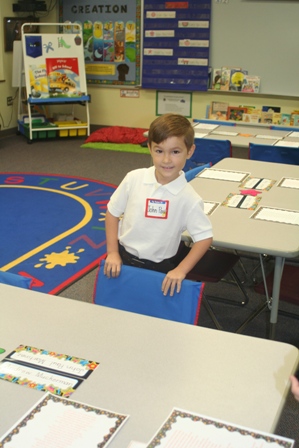
First we all took John Paul to his class room.  His teacher is the sweet and very experienced Mrs. Jennings.
Then John Paul went to his seat.  He was the first one at his table, but not the first in the room.  I think he was a little overwhelmed as he just sat there looking around checking everything out.
After some hugs, it was time to say good-bye to John Paul and take Alexander to his classroom.  I did pretty well keeping the tears in and a smile on my face until I gave him that final hug good-bye.  Pregnancy hormones!  He was only going to be at school for a couple hours that first day!  Goodness, I'm getting all teary just typing this up and reliving it!

Alexander in his 3rd grade room with Mrs. Jurgensmeyer.  It's pretty cool with large round tables instead of individual desks.  This room also has loads of animals--guinea pig, fish, geckos, and a hamster.  So far Alexander has LOVED 3rd grade and thinks it is the best yet!  He came home either that first day or the next saying they can talk ANYTIME and AS MUCH AS WE WANT as long as Mrs J. isn't talking.  Hmm, has she been able to get to know Alexander yet???!  I'm thinking that I won't be able to get too many more first day of school pictures in the classroom with him.  He was too busy checking the animals out and talking with friends.  I was able to get this last shot in before hugging and saying good-bye.
The boys are off to a wonderful start for a fun and awesome year.  :)

Monday, August 22, 2011

Baby Sonograms

There is something both incredibly awesome and exciting and yet anxiety-filled about having a sonogram of the baby.  With each baby, I have looked forward to and dreaded the sonograms.  The dread has increased with each pregnancy.  I think it's because I recognize the true gift and miracle of life and how much can go wrong and how some of this can be revealed during the sonogram.  If something were revealed to not be right, we would of course still love and care for the baby, but like all parents, I'm sure, we hope and pray for healthy and the best.
Today we got to take a peek at our little one, who is now 22 weeks.  We still have a due date of Christmas Eve.  We have a healthy baby growing.  I am so thankful and praise God for this blessing.  I feel like I can now enjoy this pregnancy and look forward to holding her in my arms.  This pregnancy hasn't been easy.  The last 2 weeks have started to improve and I'm delighted to be off all my meds.  In the last 2 weeks, she has started kicking and moving...feels like a constant party in there.  With each movement, I'm reassured that all is well.  And the sonogram confirmed that too.
Here are a few pics of our daughter:
Waving hello :)
Looks like too many toes, but really only 10 there.
Baby profile
 

Sunday, August 21, 2011

Weekly Menu

Since Candy over at Mommypalooza decided to resurrect her weekly menu plan and link up I figure I might as well stick mine up here too. I write my menu and shopping list on a piece of paper each week. Then, if I get to the grocery store(s) and something isn't available or is too expensive I know what changes to make and which meal is impacted.  I also have a handy Evo phone so I can quickly look up alternate recipes as well as double check if something is gluten free.  After shopping, I write the menu on a dry erase board that hangs near the pantry.  It's a large board so I also have the different grocery stores I frequent listed on there so that as items become needed I can add them to the appropriate list.  I've been known to snap a quick picture of the board so that I know what is needed instead of having to write it all down on paper too.
Here is this week's menu:
Sunday:  grilled salmon with lemon herb butter, sweet potato and butternut squash (from our garden) fries, quinoa pilaf
Monday: homemade calzones with choice of fillings from salami (store was out of pepperoni)  cheese, mushrooms, sausage, spinach, broccoli, and bacon; dip in tomato sauce; green salad
Tuesday: shredded chicken tacos with homemade beans, avocado, Mexican rice
Wednesday: Carmelized chicken noodle soup
Thursday: Grilled fish, Lemon-Herb Zucchini Fettuccine  (made this last week and it was loved by all. For this week, I'm skipping the chicken in it and serving the fish on the side.)
Friday: Grilled honey-mustard chicken cutlets with onions (from the current issue of Everyday Food on p43), green salad, brown rice

Serve It Up Sunday

Two Twenty One

Jaime took the kids to go launch rockets.  It's the first time I haven't gone to help and observe.  I want to go, but it's just too hot out for me right now.  Sooo, I'm using my time wisely by blog hopping and checking out what's going on out in blog world. :) 
One I enjoy reading Just A Girl.  Today she posted her Show and Share Day (SaS) review post.  Usually there are some pretty fabulous things out there that people have made, redone, created, painted, etc.  Today the Cork Candle arrangement caught my attention.  We are wine drinkers here in Casa Martinez (though not in my current state, of course!)  Off and on we will save the corks, me often saying I want to do some kind of project with them other than tossing them in a vase or decorative jar.  But, inevitably I end up throwing them away.  Now, though, I've found the perfect and quick decorative thing (and great for the Autumn season) to display/use those corks!  Chelsea has a quick and simple tutorial on her blog, Two Twenty One, showing how to make these.
I decided to check out some more of her blog when I saw her side bar pictures.  This project in particular is what started it:
Yes, peony topiaries!  Aren't they sweet?  I'm thinking of making some (the trick is finding good quality silk flowers), but in colors that would work better in our home.  Though, the pink are so sweet.  They might look too cute in Penelope's room :)  Chelsea has a step by step tutorial on her blog for these too...I'll be following it every step of the way when I make mine!
Another project on her blog is something that I already do and love to create except I do mine without the fancy-schmancy-kinda-wish-I-had-it Silhouette machine.
These applique shirts are fun to create and can be so cute and unique.  I'm thinking of making some pumpkin ones for the Autumn.  I saw one idea that made a tree on the shirt and then sewed red buttons on the tree for apples--super simple and super cute.  I've got some other ideas cooking up depending on if this baby is a boy or girl too.

Tuesday, August 16, 2011

Polyvore Coolness!

Autumn Decor

Angel Vine Topiary - Ballard Designs, $25
News Text Pillar Candle | Pottery Barn, $17
Owl Shaped Lantern | Pottery Barn, $29


Several days ago I saw this posting on Home Stories A2Z and saved it to read when I had more time.  Tonight the kids were all in bed on time since tomorrow is the first day of school.  So, I had a bit of free time to read through the info and play with the FREE Polyvore software.  Oh my!  So cool and fun and best of all EASY!  It's neat software in that it lets you clip images from all over the web and create your own buttons, decor boards, and collages.  I highly recommend it.  When you get a bit of time, check it out.  I'm still figuring it out--like posting it to my blog without necessarily having all that descriptive text under the picture and that over-sized white square.  Anyway, just check it out and be sure to check out the tutorial post about it--it helped me get a quick start. Fun!

Blueberry Muffins

Since tomorrow is the first day of school, I've been busy yet again baking and prepping food for the busy mornings with starving (their word, not mine!) boys and to quickly pack healthy filling lunches. Today I've made gluten free and dairy free blueberry muffins (again), rice pudding, French bread, and meatballs.  Okay, so the meat balls are also for dinner tonight for meatball subs, but the leftover ones also make a great lunch!  Since John Paul and Penelope finished off ALL of the granola I made last week, I'm going to have to make more along with some regular granola.  Still to make tonight are some dairy free waffles for Alexander and some gluten and dairy free pancakes.

The GF/DF blueberry muffins are SO good and easy.  The recipe I use is a variation of these Berry-blue-Blueberry Muffins.  I'm so happy to have found this recipe and that it is a family favorite.  I plan on playing with it some more and changing up the berries as well as trying it with some pumpkin or sweet potato for the autumn.

Blue Berry Muffins***
about 2 cups of blueberries (I used frozen ones that we picked earlier this summer)
2 cups all purpose GF flour (I use Silvana's blend from the Cooking for Isaiah cookbook--LOVE this blend!)
1-2 tablespoons GF flour
2/3 cup sugar (I don't always use this much)
1 tablespoon baking powder
1 teaspoon baking soda
1/4 teaspoon salt
1/2 cup almond milk (if I use vanilla almond milk then I don't add as much sugar)
1/2 cup applesauce
2 eggs
some vanilla depending on which almond milk I used


How To
Put the blueberries in a smallish bowl/measuring cup and dump the 1-2 tablespoons of flour over them.  Gently tap the sides of the bowl to knock the flour to the bottom.
In a medium bowl, put the 2 cups flour, sugar, baking powder, soda, and salt.  Mix together.  Then add the milk, applesauce, eggs, and vanilla.  Mix all together. Then add the blueberries and stir them in.
Heat oven to 350.  Grease your muffin tins.  This batter makes 12 regular sized muffins and 24 mini muffins--a fantastic amount!  I bake them at the same time for 10-12 minutes, take the mini muffins out, and let the regular sized ones bake 7 minutes or so.
This morning I forgot the eggs until I had measured about half of the muffins out!  I just dumped it all back in the bowl, mixed up the eggs with a bit of milk, poured it in the batter bowl, and mixed it all in.  They still turned out great! :)

They were super good with my berry spinach smoothie!
***If you don't need/want to make these gluten free then just use regular all purpose flour.  If you don't need/want these to be dairy free then use regular milk.


School Time!

Tomorrow I will send my 2 boys off to school.  This will be the first time that both of them will be at school, all day, together!  That leaves Penelope and myself at home.  Am I ready?  Yes and no.  Is Penelope ready?  Not the slightest bit!  She call her brothers her buddies.  When she wakes up in the morning or from a nap her first question usually is, "Where the buddies?" Quickly followed by, "I play buddies!"  She LOVES to do whatever they are doing and repeats most everything they say.  She even plays with their friends--with the exception if babies are around, she'll want to help play with and care for the babies.  I think she'll make an excellent big sister! :)  She has a small Pokemon card collection so that she can trade and play with the boys.  In the evenings, I can usually find Penelope and Alexander in bed together reading Calvin and Hobbes books.  If John Paul is bouncing or kicking a ball, so is Penelope.  I love her relationships with her buddies.

We will definitely miss the boys, but I'm so excited for them too.  Alexander starts 3rd grade and John Paul begins kindergarten.  We've met the teachers and seen the classrooms.  I think we are in for a fun and educational year.  The boys are in wonderful hands and fantastic classes. 


Friday, August 12, 2011

Almond Butter

As mentioned before, I'm frugal and when it comes to buying or making nut butters, there's PLENTY of money to be saved when making your own, not to mention that you can make them healthier too.  This week I made 2 types of almond butter--regular (or plain as my kids call it) and chocolate.  Both start out the same, both are gluten and dairy free, both are SUPER easy, and both are pretty darn tasty!
Start buy buying raw almonds.  I get mine at Whole Foods in the bulk section.  FYI--they are really on sale this week, as in $2 off/pound!
Almond Butter
Ingredients
raw almonds
a bit of salt
some oil (I used both extra virgin olive oil and some Earth Balance coconut spread)
How To
Roast your almonds (for this batch I used about 3 cups of almonds) on a baking sheet for about 20 minutes at 400 degrees.  Keep an eye on them and give them a little stir half way through.  This step is not necessary, but it adds some great flavor!
Remove almonds from oven and either let cool on the pan or pour into your food processor and let cool some there.  Be careful, these nuts are HOT!
After some time, whiz them around in the food processor with a bit of salt (I always use Kosher salt--the bigger pieces of salt--instead of table salt, just personal preference) to start chopping them up. 
In this picture they are course ground.  If you keep going and don't add any fat, you'll have almond flour.  However, today I'm making almond butter so I keep going and add the fat.  I added a few tablespoons (sorry I just poured it in and eyeballed the amount) of EVOO.  It was still pretty thick and I was beginning to run out of EVOO so I thought I'd try adding the coconut spread.  It worked great.  Since my nuts were still warm, it just kinda melted right in when I turned the processor back on.
See how it's beginning to look like almond butter?  I dare you not to try some at this point!  It was so yummy when it was warm.  You can keep adding the fat until you get a desired consistency.  I keep our almond butter in the fridge, so it thickens more in there.  I just stick some of it in the microwave to soften it a bit before spreading on bread.

Chocolate Almond Butter
Follow same recipe as above, but mix in some cocoa powder toward the end.  When I made ours this time I just stirred in the cocoa powder in the jar.  Just taste it a bit as you go and add more cocoa powder until desired flavor.
The 3 cups of almonds made 1 1/2  jars of almond butter.


Honey Almond Butter
Follow almond butter recipe, but add in some honey.  Easy!

Of course a sweetener can be added to any of these, but since a favorite sandwich in our home is almond butter with honey and cinnamon, I don't add any sweetener (honey, agave, sugar, molasses) to my butters when making them.
Almond butter can be used to make sandwiches, used in smoothies, enjoyed by the spoonful, cookies (replace the peanut butter with the almond butter), etc.  So good!  Also, almonds are a good source of calcium.
Enjoy!

Super Easy Homemade Foods

This week I've been doing plenty of cooking.  I think I was inspired by the prospect of school starting for the boys next week and knowing that they eat MASSIVE amounts of food especially at breakfast.  Because I'm cheap frugal I refuse to spend half of Jaime's paycheck on pre-made foods that I can easily make at home.  Seriously, $6 for about 2 cups of GF granola!? Crazy!  Anyway, I'd been promising John Paul that I'd make him some granola and when I saw Whole Foods had the GF oats on sale this week I grabbed a couple of bags.  I also make non-GF granola for myself, Jaime, and Alexander, but this was a special batch.  The breakfast foods made this week along with the granola, were almond butter and chocolate almond butter, and gluten free and dairy free blueberry muffins. 
So, first up is the Gluten free Dairy free Granola:

What I like about cooking is that you can substitute ingredients.  These are what I used, but change it up for your needs and flavor likings.
INGREDIENTS
about 3 cups GF slow cook oats
couple of handfuls of chopped walnuts (use any nuts or seeds or none at all)
sunflower seeds
couple pinches of salt
several shakes of cinnamon
a few dashes of cloves
oh about 1/4 to a 1/3 of a cup of molasses
somewhere around a 1/3 cup of honey (can use agave or brown sugar as a sweetener too or instead of)
a few tablespoons or so of butter of some sort (this time I used some coconut butter that Jaime bought a while back when it was on sale)
vanilla extract (optional and can sub almond or orange extract)
HOW TO
Because I do all of the dish washing here, I like to use as few dishes as possible and keep a pretty clean kitchen as I go along.  Keeping that in mind, you can use as many dishes, pots, pans, and spoons as you wish. :)
Heat oven to 400.
First pour the oats on to a baking sheet (or you could use a 9x13 probably) then add the nuts and seeds and salt. 

Because the walnuts are fairly soft and I don't want to spend my day standing and doing dishes, I just somewhat crush them in my hands. 
In a glass dish (or if you want to use your stove top, use a pot) combine some butter--a few tablespoons I suppose--some honey, molasses, cinnamon, and cloves.  Then melt in the microwave or in your pot.  FYI--this coconut butter melts SUPER FAST!
It looks kinda gross up there, but I just pulled the melted mixture from the microwave and didn't stir it yet.
Take this sweetened mixture and pour it over the oats, nuts, and seeds.
Mix it all together so that the oats are coated.
Is it becoming painfully obvious that I really need to take some photo lessons from here or here?!
Then stick your pan in the oven for about 30-40 minutes, stirring once or twice during cooking.  Let cool completely before storing in a container in the pantry.
You noticed that there isn't any fruit in here.... Well, I like to mix things up a bit and my 2 GF eaters can't agree on what they both like.  So, when I serve granola I also add some sort of fruit, usually dried, to it as well.  You can add fresh fruit too.  They also like to add their GF crispy rice to the granola and pour almond milk over the top or eat it with dairy free yogurt.
Enjoy!
The almond butters and muffins will come later today hopefully :)

LinkWithin

Related Posts with Thumbnails