
Showing posts with label sewing project. Show all posts
Showing posts with label sewing project. Show all posts
Monday, July 12, 2010
Evo Love
Over the weekend Jaime and I got new phones...we seriously upgraded from what we had. We now each have an Evo. Wow! These are amazing phones. We are in awe with the technology nowadays. We spent too much time this weekend playing with them and getting them all figured out, downloading apps and whatnot. This morning I'm in the process of making a little clutch to carry mine in. I'll post pics once it's done...I keep getting interrupted by little ones :)


Wednesday, July 7, 2010
Pretties for P
My aunt has made Penelope some cute dresses. Last week we got a surprise in the mail from her. She made Penelope a tutu, headband, and a dress with bloomers. It all coordinates with shades of blue and purple. When I opened the box she insisted on wearing the headband and tutu immediately :)


 She's such a sassy, girly girl, but is so tough and loud. We just love our Rosie!


Thursday, May 20, 2010
Fancify My T-shirts
I'm a T-shirt wearer, but I've been wanting to look more dressed up, pulled together, cleaner, and fancier, so I've found some fairly easy ways to fancify my T-shirt wardrobe. Here are a few of ideas:
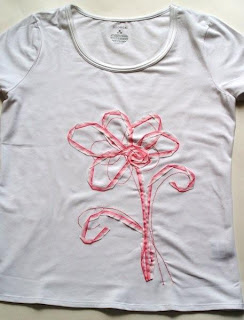

 And these last ones...not T-shirts, but fit the bill of getting a little dressy :)


Most are knock-offs of some pricey T-shirts at places like Target, J-Crew, Anthropolgie, and others.All of these ideas are already tutorials, so they're that much easier :)
Photo credits: Ribbon Flower, Ruffle Shirt, Center Ruffle, Dressy Tunic, and Alice Dress.


Most are knock-offs of some pricey T-shirts at places like Target, J-Crew, Anthropolgie, and others.All of these ideas are already tutorials, so they're that much easier :)
Photo credits: Ribbon Flower, Ruffle Shirt, Center Ruffle, Dressy Tunic, and Alice Dress.
Friday, April 9, 2010
Loooong time
I understand that part of having a blog means updating it. I've been veerrry bad here. However, I've got lots of pictures and projects to share :) Buuut, they will have to wait until I can get more than 2 minutes to sit here and work on them. Until then, check out this cool new site a good friend of mine started, Momma Reads.
For you, Patricia :) Have a great day and I know all will be okay :)


A tutorial will come on how to make these cute soft baby blocks and taggie blankie.
For you, Patricia :) Have a great day and I know all will be okay :)


A tutorial will come on how to make these cute soft baby blocks and taggie blankie.
Friday, March 5, 2010
Tutu Shirts
I promised a while back some pictures as well as tutorials. So, here's to partial promise keeping :)
These are 2 tutu shirts. I forget which blog I saw them on and adapted the idea (if you know, let me know please) from, but I will keep hunting. They are super simple and just too much fun. These shirts I got on clearance at Target. I really wanted some in a similar style for Penelope, but they were all sold out in her size. These are 4/5. To make them, lay the shirt flat and measure across the bottom of the front of the shirt. Double this number to have the distance all the way around the shirt. Next, measure the tulle 2.5 times more than the total of the shirt. So, if the shirt front is 15 inches, then all the way around is 30. Your tulle length should be 75 inches. These are made with 2-3 layers of tulle. Sew your layers of tulle together, but do not back stitch. Pull the bobbin thread to gather and make the ruffle/tutu. Sew the tulle to the bottom of the shirt, right sides together. Flip the tutu down and you've got a dressed up sassy shirt. Pair with leggings or jeans~~super cute and fun!


These are 2 tutu shirts. I forget which blog I saw them on and adapted the idea (if you know, let me know please) from, but I will keep hunting. They are super simple and just too much fun. These shirts I got on clearance at Target. I really wanted some in a similar style for Penelope, but they were all sold out in her size. These are 4/5. To make them, lay the shirt flat and measure across the bottom of the front of the shirt. Double this number to have the distance all the way around the shirt. Next, measure the tulle 2.5 times more than the total of the shirt. So, if the shirt front is 15 inches, then all the way around is 30. Your tulle length should be 75 inches. These are made with 2-3 layers of tulle. Sew your layers of tulle together, but do not back stitch. Pull the bobbin thread to gather and make the ruffle/tutu. Sew the tulle to the bottom of the shirt, right sides together. Flip the tutu down and you've got a dressed up sassy shirt. Pair with leggings or jeans~~super cute and fun!


Friday, February 19, 2010
Car Roll-up
I told you these roll-ups are easy and can be used for several different things...this morning I surprised myself and made this car one in just about an hour. I've got pictures for the tutorial and will post them along with all my other ones from the past week, but my filthy kitchen is calling and since 2 kiddos are sleeping I've got to make the best use of my time!


I did have a little helper through the entire process :)
Wednesday, February 17, 2010
Pictures and Projects
I've got a handful of projects that I want to show you and even a couple of tutorials too. I just haven't been good about uploading/downloading the pics from my camera. So, for now I'll just tell you...
A couple of tutu shirts
A tutu skirt/apron
More crayon and marker rolls
A couple of bags
A super quick and easy baby blanket
and lastly, a couple of pillows.
I promise the pictures and tutorials will be here soon!
A couple of tutu shirts
A tutu skirt/apron
More crayon and marker rolls
A couple of bags
A super quick and easy baby blanket
and lastly, a couple of pillows.
I promise the pictures and tutorials will be here soon!
Wednesday, February 10, 2010
Crayon Roll-up


Last night I threw together this crayon roll-up...and am pretty happy with it :) It turned out to be a quick and simple project...I managed to cut it, pin it, sew it in about an hour...maybe less, I had some interruptions...imagine that! It holds 16 crayons. I've got plans to make marker roll-ups too! And, while I'm at it, I think I'll make Alexander one for his colored pencils. Imagine the organization, color, and fun these will bring :) Then, we can store all the art (yes, you can make roll-ups for numerous other things as well) roll-ups in this nifty little bag I made yesterday (I even lined it!).

Monday, February 1, 2010
Last week's crafts
Two out of the three crafts I did last week got the reject vote from the judge in my home. I like 2 of the 3 and am playing with the one I don't care for to make it something that I do like. Here are pics of the 3 crafts and I'll let you be the judge.


Ribbon Ring

Fabric Coasters (the mod podge on them in this picture is still drying)


Twine-wrapped frame
Go ahead, leave honest comments, I can take it, I promise :)
Friday, January 22, 2010
New Dress
I started making Penelope a dress last night based off of the tutorial that Disney has over at Ruffles and Stuff. I was able to finish it up today and even have Penelope wear it too. I'm pretty happy with the way it turned out and it was very easy. The shirt part though has a pink stain in a funky spot and I haven't quite decided how I want to cover it up. So, what do you think?
I started just like Disney said to, with a stained shirt

then I measured the width, which was conveniently 10 inches

Since it was 10 inches across, I used fabric that was 40 inches so that I could gather it up and also have it go all the way around. I also added a little fabric at the bottom for some fun. The length of the skirt part was 9 inches then the accent part was 3 inches. I used Amy Butler material and love it!


I started just like Disney said to, with a stained shirt

then I measured the width, which was conveniently 10 inches

Since it was 10 inches across, I used fabric that was 40 inches so that I could gather it up and also have it go all the way around. I also added a little fabric at the bottom for some fun. The length of the skirt part was 9 inches then the accent part was 3 inches. I used Amy Butler material and love it!


A little side note, Penelope took 5 steps while I took these pictures and she's 13 months old today :)
Thursday, January 21, 2010
My List Gets Longer
My list of projects is getting longer~by the moment it seems~and it makes me so HAPPY! :) I saw this super cute


and super simple dress tutorial and know that some will be hanging in Penelope's closet soon. And probably in my nieces' closets too! Disney, over at Ruffles and Stuff, is the one who gets all the credit for this cute little dress. What a great way to cover stains and reuse those cute clothes that most think are ruined. You should check out her blog~she's such a fun and creative gal who I wished lived closer.


and super simple dress tutorial and know that some will be hanging in Penelope's closet soon. And probably in my nieces' closets too! Disney, over at Ruffles and Stuff, is the one who gets all the credit for this cute little dress. What a great way to cover stains and reuse those cute clothes that most think are ruined. You should check out her blog~she's such a fun and creative gal who I wished lived closer.
Next project
When I first saw these, I knew I had to make them. I've got to check the basement to see if I have some elastic cording, but if I don't you know I'll be picking some up! I'm picturing making them for younger girls. I'm thinking in pinks too. And, you know these cute little buttons could be attached to felt instead of cloth, the cloth can be cut into a flower shape, instead of attaching them to a ring, put them on a hairbow or a headband, embellish a bag...oh goodness, the possibilities are endless! Thank you Linda for your wonderful idea and tutorial!


Thursday, January 14, 2010
Naomi's Apron
Here it is as promised. This little mini apron was pretty quick and easy to put together (I'm getting better and faster with each one!) I used pieces of 3 different fat quarters for it and have plenty left over to make a matching one for Penelope. I love the girly-ness of it. All the pink and the ruffle...so much fun. Happy cooking Nomers!


Wednesday, January 13, 2010
A Sneek Peek and a Tour
So I wanted to show you my completed project, but my model is asleep. You'll have to wait until morning, but until then, you can see a sneek peek


And, since I happened to take a few pictures of my workspace, you can see those too.

As I look at this picture, I can think of so many ways to organize that bookshelf behind the ironing board.

Yep, that's my nice cutting table...conveniently next to the My Little Ponies that Penelope and I like to play with.

And where oh where would I be without this? My mom's old sewing machine perches on the end of a makeshift table that I set up back in my scrapbooking days. I still love scrapbooking and I know one day I'll get back to it, but for now it's all blogged.
Subscribe to:
Posts (Atom)
LinkWithin
