Showing posts with label recipes. Show all posts

Tuesday, June 19, 2012

Almond Butter Strawberry Waffle Sandwich

Mmm, this sandwich is so yummy and perfectly filling.  It makes a great breakfast, snack, or dessert.
This sandwich came about out of my desire to finish off the waffles, a few spare strawberries, and a need for protein.  I liked it so much that I had to make it again...but I used up the last of the waffles.  I did, however, have some GF bread and GF cinnamon raisin bagels.  It still tasted fabulous!  So, you've just got to try it!  Breakfast is such an important meal and should be treated as such.  Eating protein (the almond butter) in the morning will help energize you as well as help you to feel full longer.  The strawberry provides some sweetness as well as a small amount of fiber.  This is sort of like a grown up PB&J...and kids love it too :)

Ingredients
waffle (can be dairy free and gluten free)
almond butter--1-2 tablespoons
2 strawberries, sliced
cinnamon
honey--a teaspoon or so, optional
Directions
Heat or toast waffle (or bread or bagel).  Spread the honey on the waffle then spread the almond butter over the honey.  Top the almond butter with the strawberry slices and sprinkle with cinnamon.  These are great open faced or topped with another waffle.
Serves 1
Enjoy!

Monday, June 11, 2012

Coconut Berry Smoothie

There's no doubt about it, summer's warm temps are here and here to stay.  The warm temps are great for getting out to the pool, playing in sprinklers and on the slip and slide, eating lots more salad and fresh fruits and veggies as well as more smoothies.  I LOVE smoothies and have been making more of a variety than my usual kind of frozen fruit, yogurt, OJ, and spinach.  I came up with this new one recently and was pleasantly surprised at how yummy and fresh it was.
It was super quick and easy to throw together with only 3 ingredients:
Frozen berries (couple of handfuls)
1 can coconut milk
honey (sweeten to taste)
Throw all of these in your blender or use an immersion blender like I do.  Mix it all up. Then enjoy!
Do you have a favorite smoothie?
Linked up at A Little Nosh

Monday, May 21, 2012

Popcorn!

We LOVE eating popcorn here.  I have a WhirlyPop that I use to pop the kernels on the stove top.  I love it...it pops pretty much every kernel and works almost as fast as popping it in the microwave.  While checking out Pinterest, I came across this great picture and think that I will most definitely be making this popcorn recipe very soon.  The only change I'll make is the butter--I'll try either ghee or coconut oil in its place so that the snack will be gluten and dairy free.
Source
Then I found this recipe for chili powder and dark chocolate popcorn!!! 
Source
While strolling the aisles of Whole Foods, I've found a whole new chocolate world.  They carry a gourmet selection of delicious gluten and dairy free chocolate.  While the bars may be a bit pricy, they taste exquisite and very little needs to be eaten at a time.  I think I'll have to pick some up to make this Chili Powder and Dark Chocolate Popcorn. :)
What's your favorite snack?

Monday, May 7, 2012

Frozen Banana Snack

The boys come home from school absolutely STARVING.  I could almost serve dinner at 3:30 and they'd be happy to eat it. Buuut, they'd be STARVING by 5:30.  Afternoon snacks are a must.  I know I like to snack too :)  I can't serve any wimpy snacks because if I do, then the boys are starving within minutes of eating and are begging for more food and generally driving me crazy while I'm trying to make dinner.  The other day I had some bananas sitting around so I thought I'd try something new for them...the Frozen Banana Snack! 
It's a quick and easy snack to throw together and have ready when the boys get home in the afternoon.  Gather a banana, Popsicle sticks, peanut butter (or other nut butter), chocolate chips (roughly chopped), and foil.  First, cut the banana in half and push a Popsicle stick in the cut end.  Then spread some peanut butter (or other nut butter) over the banana.
Roll the banana in the chopped chocolate chips then wrap the foil around the banana and place it in the freezer.
{These chocolate chips weren't chopped much. After making this one, I chopped the chips up more and they stuck better without having to use so many per banana.}
These take a couple of hours to freeze, so plan ahead a little if you want them frozen or serve immediately.

After eating these, the kids were happy and didn't ask for more food until dinner time  :)
*If you don't have any sticks, no worries, just prepare them without the sticks and serve with a fork or spoon.  Also, these can be made smaller and served as individual bites.  Freeze individual bites on foil without wrapping up.*

Sunday, April 29, 2012

Sweet Treats

In my desire to cut the amount of sugar we consume, I've come across many sweet treats that I'd love to try.  Some are naturally sweetened by fruit others honey, and yes, some with sugar and chocolate chips.  Did you know that a high consumption of sugar rots teeth not just on the outside, but from the inside as well. So, indulge as a special treat and enjoy! :)
This Chocolate Chip Cookie Pie is in.cred.i.ble!  It's from Chocolate Covered Katie, so it's got some nutritional value and is dairy free.  It's also gluten free.  The recipe calls for a hefty amount of brown sugar, but I've made it with only about a half cup of brown sugar which is less than half the amount called for in the recipe. Also, when we've eaten it, I haven't topped it like in the picture, but that sure does look good!
Source
This next one is one I found via Pinterest, but haven't had a chance to try yet.  It looks and sounds so delicious.  Let me know if you try it.  Don't be scared to use coconut oil.  I had a jar for several months before I started using it.  I'm in love with the stuff now!  It's extremely nutritious and versatile to use.  These treats are called Oatmeal Chocolate Peanut Butter No-Bake Candy Bars.  This recipe calls for dried cranberries--remember not all dried fruit is created the same, some have added sugar, so read the labels if you really want to watch how much sugar is used.
Source
And, if you're going to indulge, eat something yummily good for you either before or after.  I suggest this version of a kale salad.  It's got a satisfying sweet and salty combo with a crunch and fiber to fill you up.
Source
When I made it, I made a few changes to it.  I didn't use 8 cups of chopped kale--probably about 5, I just chopped up one and a half bunches.  I used more than a pinch of salt, didn't let my quinoa cool, no macadamia nuts, entire avocado, a handful or two of dried cranberries.

When you're cooking, don't be afraid to change up a recipe a bit to meet your needs, substitute ingredients, or try something new.


Monday, April 23, 2012

Peanut Butter Crispies

These have been a yummy treat and even breakfast here.  It's got some protein, fiber, carbs, healthy brain fat, and a bit of sweetener.

Peanut Butter Crispies (Inspired by this recipe)

Ingredients
scoop of peanut butter (or any nut butter of your preference)
scoop of coconut oil
a sweetener of choice--sugar, honey, agave, maple syrup, coconut sugar*--but not too much
crispy rice cereal (I use Barbara's Brown Rice Crisps--they're gluten free)
Directions
Place the nut butter, coconut oil, and sweetener (if using) in a microwave safe bowl.  Heat in microwave for about 20 seconds to warm and soften.  Stir the ingredients in the bowl.  After mixed, add in some cereal and stir to coat the cereal.  Enjoy warm or stick it in the fridge to harden.  My kiddos like this with a couple chocolate chips on top :)
*Check out this info about Coconut Palm Sugar.  I need to research it more, but it is worth it!  Coconut oil is so important and nutritious for us.  Our brains and cell walls need the healthy fat in coconut oil.  Chocolate Covered Katie has some fabulous treats using coconut oil!

Sunday, April 22, 2012

Supercharged Spaghetti and Meat Sauce

Spaghetti and meat sauce is quick and easy dinner in our gluten and dairy free home.  It's an easy meal that you probably already have in your meal rotation, so why not give it a nutritional boost?

Supercharged Spaghetti and Meat Sauce
Ingredients
Pasta--any size or shape, can be gluten free
1 lb ground beef
1/2 to 1 onion, diced
1 jar organic pasta sauce--have fun with this and choose a family favorite, but watch for added sugar or allergens
1 zucchini, shredded
1 carrot, shredded
fresh or frozen spinach, if frozen, thaw
red wine (optional, when I add it I add probably about a 1/2 cup, but it also depends on how much is left in the bottle)
Directions
Bring a large pot of water to boil.  In a large saute pan, brown the ground beef.  Add the diced onion and saute for a few minutes.  Add the jar of pasta sauce and heat through.  Stir in the veggies and red wine.  Let simmer while the pasta cooks in the pot of boiling water.  When the pasta is done cooking, drain the pasta.  Add the pasta to the meat sauce and toss to cover.  I like to serve this with a sprinkle of nutritional yeast seasoning and/or some Parmesan cheese.  It also tastes great with a side of kale salad!

Saturday, April 21, 2012

Kale Salad

This kale salad is adapted from the kale salad at Unforked and is a fraction of the cost.  And, because you are making it, you can easily create it to be gluten and dairy free.  :)
I was quite skeptical at first, but after a friend swore that it was the most delicious thing, I had to give it a try.
And now, I think you should too :)

Kale Salad
Ingredients
1 bunch green kale (I've made it with the green kale and the purple kale.  The purple kale was a bit tougher and didn't taste quite as good in our opinion.)
lemon juice
extra virgin olive oil
salt
pepper
bread crumbs (Glutino makes some great gluten free bread crumbs)
Parmesan cheese and/or Bragg's Nutritional Yeast Seasoning (the yeast seasoning has a Parmesan cheese flavor and is quite healthy and a great alternative to the Parmesan cheese)

Directions
Rinse the kale and pat it dry.  Pull the leaves off of the tough center stem.  Discard the stems.  Chop the leaves and place them in serving bowl.  Sprinkle the leaves with the lemon juice, olive oil, salt, and pepper.  (The amounts of these are to your personal liking.  Start with about 1-2 tablespoons of lemon juice and olive oil and adjust from there.)  Toss the kale.  Sprinkle with bread crumbs and cheese and/or seasoning.
Enjoy!

Friday, March 2, 2012

Roasted Broccoli

I'm a picky eater. Yes, despite all the interesting foods I post in our Weekly Menus, I'm a picky eater.  A friend laughed disbelievingly at this tidbit of info that was shared with her this past weekend.  However, I've come a looong way :)  My husband reminded me of just how far I've come.  Ten, twelve, years ago I told Jaime I'd make him dinner.  I served him a plate of pasta with Parmesan cheese on top.  The cheese in the green can.  There's still quite a bit that I don't like--eggs, hot dogs, bananas, ham, shrimp...shall I continue?  I would eat broccoli but it had to be cooked/steamed and have a sauce--not cheese sauce though--in order for me to eat it.  Tonight though, I (and the family) couldn't eat enough of the broccoli (and parsnips) I made!  While grocery shopping this afternoon, Penelope requested the little trees.  I remembered seeing on Pinterest several people post about how delicious and addicting roasted broccoli is, so that's what I did.  It truly is YUMMY!!!

Roasted Broccoli via mostly from Amateur Gourmet
1-2 bunches of broccoli--washed or not washed (high heat oven will kill pretty much everything) if wash DRY IT WELL, cut in to florets--I did some small and left some a bit larger
2-3 Tablespoons olive oil
coarse salt and fresh ground black pepper
1-2 Tablespoons lemon juice
3 garlic cloves, sliced--not too thinly

heat oven to 425. place the DRY broccoli and garlic slices on to a baking sheet.  drizzle with the olive oil. sprinkle the salt and pepper on top. bake for 20-25 minutes (you want some brown edges). remove from oven. sprinkle with the lemon juice. devour!


Monday, January 23, 2012

Sauteed Kale with Onions and Bacon

Last night instead of our salad I made some sauteed kale to go along with our grilled tilapia and mashed cauliflower.  I had bought the kale last week with the intention of making kale chips.  The week went by and I just never got around to making the chips.  I wanted to try something different with the kale.  I started by browning 5 slices of bacon (I buy nitrite and nitrate free bacon from Whole Foods).  After it was nicely crisped, I removed the bacon from the pan and poured off most of the grease.  Then I added the chopped up kale and half of a large onion chopped. I sauteed this over medium high heat for several minutes.  After the several minutes of sauteing, I added 4 or 5 cloves of finely diced garlic and let it all continue to saute for several more minutes.  To deglaze the pan I added about 1/4 cup of chicken broth.  After the broth of absorbed/cooked off, I tossed the cooked bacon back in the pan.  We all (except Penelope who claimed the entire meal to be too wet) loved this dish (I put red pepper flakes on mine for added yum!).  I will be making it again for sure.
Source

Sauteed Kale with Onions and Bacon
Ingredients
1 bunch kale, rinse, then tear the leaves from the stalk, then chop the leaves (discard the tough stalk)
1/2 large onion, chopped
5 slices bacon, chopped (I cut mine in to pieces with my kitchen scissors)
4-5 cloves garlic, diced
1/4-1/3 cup chicken broth (could use water if no broth on hand)
salt and pepper
red pepper flakes (optional)
Directions
In a saute pan, cook the bacon over medium heat.  Use a slotted spoon to remove the bacon after it is cooked.  Pour off all but a couple of teaspoons of the grease.  Add the chopped kale and onion to the pan.  Stir it all around and saute for several minutes, about 5-7minutes over medium to medium high heat.  Add the garlic, stir around and continue to saute for 3-5 minutes.  Add the chicken broth and scrape the bottom of the pan to deglaze, continue stirring and sauteing for about 3-5 minutes.  Add the bacon back in to the pan, stir around.  Add the salt and pepper to taste.  Add the red pepper flakes.  Serve warm.

Thursday, January 12, 2012

Unstuffed Acorn Squash with Sausage and Quinoa

I really should have taken some pictures of dinner while I made it and before I served it, however I prepped and cooked 90% of this meal one handed while the other hand held Stella (who is amazingly already 3 weeks old and still an angel of a baby!)  I call it "unstuffed" because I had originally planned on putting the stuffing mixture in the squash, but due to time, having 5 people to feed and only 4 squash halves, and my one-handed abilities, I opted to serve the stuffing next to the squash. 
source

source
Unstuffed Acorn Squash
For the acorn squash
2 acorn squash (cut each squash in half and scrape out the seeds)
1-2 Tablespoons ghee, butter, or butter substitute
1/2 teaspoon sage
1/2 teaspoon garlic powder
Directions
Heat oven to 400.  Put the squash, cut side up, in a 9x13 baking dish.  Place 1/4-1/2 tablespoon of ghee/butter in each half of the squash. Sprinkle the sage and garlic powder on each half of squash.  Roast in the oven for about 30-45 minutes.  The squash should be fork tender.  When done, you can either scrape the squash in to a serving bowl and discard the outer skins or serve the stuffing inside each half of acorn squash.
For the stuffing
1 pound Italian sausage (casings removed)
1 onion, chopped
4-6 ounces mushrooms, chopped (I used some mini portabella mushrooms that I had on hand, but the white button ones would likely work well too)
1/2-1 teaspoon garlic powder
1 apple, chopped
handful or two of dried cranberries
1 1/2 cups cooked quinoa (2 cups chicken broth and 1 cup quinoa--mix both in a pot, bring to a boil, simmer about 10-15 minutes)
salt and pepper to taste
Directions
While the acorn squash is roasting, cook the quinoa in a small pot.  Also, in a skillet, brown the sausage.  When sausage is cooked, remove it from the pan and pour off all but a couple of teaspoons of drippings (depending on the quality of sausage, you might not of much in the way of drippings).  Add the chopped onions and mushrooms to the skillet.  Saute for 3-5 minutes.  Add the garlic powder, chopped apple, and dried cranberries.  Saute for 3-5 minutes.  Add the sausage back in to the skillet.  When the quinoa is cooked, add it to the skillet.  Mix it all up well and add salt and pepper to taste.
Serve the stuffing inside or along side the acorn squash.
This is a delicious meal all on its own or fabulous meal with a salad on the side.
Enjoy!

Wednesday, January 11, 2012

Chocolate Pancakes, shh, they're healthy!

I made some chocolate pancakes for us to have for breakfast.  They are gluten free, dairy free, and healthy.  Healthy as in made with buckwheat and quinoa healthy!  And oh do they taste GOOD.  They're delicious plain, with some peanut butter, with some jelly, with some peanut butter AND jelly.  I bet they'd be great with some marshmallow fluff too :)  We will be enjoying these along with some berries (and I bet a couple people in my house will have some with peanut butter and banana slices!) for breakfast.
GF/DF Chocolate Quinoa Pancakes
Ingredients
2 cups GF all purpose flour* (I use Silvana's blend from Cooking for Isaiah)
1 cup buckwheat
2 teaspoons baking powder
1/2-3/4 cup sugar (could sub another sweetener if desired)
1/2 cup cocoa
1/4-1/3 cup milled flax seed
2 eggs**
1-2 teaspoons vanilla
2-3 cups almond milk (or rice, soy, cow milk)
2-3 Tablespoons oil (I used olive oil)
1/2-1 cup cooked quinoa (I used some that was left over from a previous recipe. To make the quinoa, use 2 parts water to 1 part quinoa, mix the 2 together in a pot, bring to a boil, simmer for 10-15 minutes. Let cool before adding to batter.)

Directions
Mix all of the dry ingredients together in a large bowl.  Add in the eggs, oil, vanilla, quinoa, and 1-1.5 cups of the almond milk.  Mix well.  Slowly add in more almond milk until your batter is the consistency of thick pudding (if you want thinner pancakes, use more milk to thin out the batter).  Let batter rest while the pancake griddle heats up.  Use about a 1/4 cup of batter for each pancake.  If your batter is nice and thick, use the back of a spoon to help spread it in to a round pancake shape.  Cook until the edges are done then flip to finish cooking.  For me, this made over 2 dozen pancakes--plenty for breakfast for the family as well as some to stash in the freezer.
*Can be made with regular all purpose flour
**Can be made egg free by using more milled flax seed (3T=1egg)
Enjoy!

Leave a comment here and let me know if you give these a try.
Linked up at A Little Nosh and Momnivore's Dilemma 

Wednesday, November 30, 2011

Soaked Oats WORKED!

Oh my, I am SO EXCITED!!!! Soaking the oats for 24 hours then cooking them up super fast this morning worked!  Each boy was full after only ONE bowl.  I couldn't believe it.  AND, they each said they LOVED the oatmeal.  I'm so happy that they like something that's quite healthy for them.  Are you intrigued?  Do you have insatiable appetites to fill?  Are you wanting to improve the food you eat?
Here are a couple of resources that I have read:
Some excellent info at Momnivore's Dilemma blog--she's got several great posts about nutrition
Soaking Grains at the Kitchen Stewardship blog--she's also got several recipes there too
There are many more out there including a book, Nourishing Traditions by Sally Fallon.
When I asked Nicolette of Momnivore's Dilemma for some resources about soaking grains, she recommended a few other blogs:
Nourished Kitchen
Food Renegade
Kelly the Kitchen Kop
Cheeseslave
I haven't made my way through those blogs, but I bet there's plenty of great info to read there.

Quick Soaked Oatmeal
Adapted from Kitchen Stewardship*
In a pot, combine about 1 cup of water (bring this water to a boil in the microwave first), 1 cup of oats, and a bit (I just used the cap so it was about 1/2 teaspoon) of Bragg apple cider vinegar
I bought the medium sized bottle at Target for about $5.  This stuff is incredible!  Check it out.
Leave the lid off for a couple of hours so that the chlorine from the tap water can evaporate.  Cover the pot and leave it alone.  You want the oats to soak for about 24 hours.
Just before cooking, add about a cup more water to the pot. (I didn't measure any of my water or oats, just threw it together.)  Bring to a boil and stir for a few minutes--3-5 min.  Serve.  That's it!  So fast. 
Can serve with dried fruit, milk, cinnamon, brown sugar, butter, etc.

*I needed to keep our dairy free.  At that link she explains some of the reasoning and science behind soaking the oats.

Tuesday, November 29, 2011

Heathier Breakfast and Soaked Oats

My kids eat dozens of eggs!  I'm trying to cut some eggs out of the breakfast routine and add more healthy variety.  I've been reading about the importance of soaking grains before eating them.  I'm trying to fill my kids up more with less food--crazy, right?  Some say that eating soaked oatmeal is more filling than eating today's regularly prepared oatmeal.  My kids love oatmeal and often eat it as a snack.  Tomorrow they will be served oatmeal that has been soaked.  I'm really hoping that they like it.  I say tomorrow because in my reading I've learned that the oats are best and healthier after soaking for 24 hours.  I'll let you know how it turns out.
This morning marked the second time I made Cream of Buckwheat for breakfast.  The first time I made it was a couple of weeks ago.  I made just a small amount to see if the kids would like it.  There was nothing left in the pot after they ate :)  Success!  Today I made it again, made more so that Jaime and I could have some too.  I told Jaime I packed it for his breakfast as he was heading out the door.  I know there was a slight groan.  However, later I got a text--he really liked it and was pleasantly surprised that he liked it.  Yea, double success!!!  Oh, I like it too.  Cream of buckwheat is gluten free and can be made dairy free as well.  I found the cream of buckwheat at Whole Foods on the same shelves as cream of wheat, oatmeal, and such.
source
Making the cream of buckwheat is very simple and doesn't really take any longer than making oatmeal or eggs.  The 2 times I've made it, I've cooked it in vanilla almond milk to make it sweet (terrible, but I knew that would ensure the kids would at least try it).  I love cream of wheat with some butter on it.  I am looking forward to making cream of buckwheat without the vanilla milk and adding some butter to it.

Cream of Buckwheat--Gluten and Dairy Free
Ingredients
2 1/2 cups vanilla almond milk (any milk or water will work)
1/2 cup cream of buckwheat
couple dashes of salt (optional)
Directions
Bring the milk to a boil, add the cream of buckwheat and salt, stir, bring back to a boil. Reduce heat to a simmer and stir frequently for about 10 minutes.
I serve it with some walnuts, dried fruit, and cinnamon on top.


Sunday, November 20, 2011

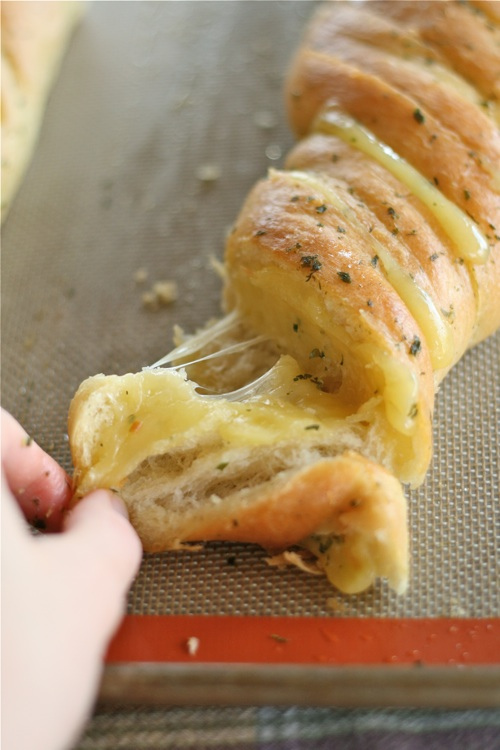
Garlic Cheesy Herb Bread

Last night I made this incredibly delicious garlic herb cheesy bread.  I got the idea from this recipe, but used my own bread recipe and made a few other changes. 
Just look at this awesome yummy bread!
source  
I tell you this bread was so what I've been craving (along with the jalapeno poppers my dear husband picked up for me.)
To make it yourself, just make up a batch of bread dough (or you could even thaw out some of that Rhodes dough, but making your own really is simple and quick).  Let the dough rise for an hour then separate in to 2 equal parts.  Form the dough in to 2 baguette shaped loaves.  Let loaves rest about 10-20 minutes while the oven heats up.  Bake the 2 loaves at 375 for 15 minutes.  Then, while the loaves cool some, melt about a 1/4 cup of butter in the microwave.  Add some Italian seasoning and garlic powder to the butter. Thinly slice some cheese.  I used mozzarella.  Use a bread knife to slice about 3/4 of the way through the bread. 
source
Next spoon or brush that melted butter mix over the top and in between the slices of the bread.  Then, slide the slices of cheese in between the slices of bread.  Put the bread back in the oven (I lowered the temp to 350) for about 5-7 minutes to melt all that cheese.  Try to resist immediately eating slice after slice of buttery, cheesy, herby, garlic bread.  Let it cool for a few minutes so you don't burn your tongue...seriously.  Then just pull off a couple of slices and indulge.  You can even heat up some marinara sauce to dip it in. 
Enjoy!

Thursday, November 10, 2011

Delicious Eggplant Meal

I made this delicious eggplant meal for Jaime and I.  It was kind of a spur of the moment thing.  During Penelope's nap this afternoon I did my meal planning for next week.  I knew I needed to use an eggplant that I'd bought a couple weeks ago.  So, for some ideas I turned to Pinterest and just did a quick eggplant search.  I found some beautiful examples of the color eggplant being used.
Source

Source

Source
And I also found this
I knew I'd be making it quite soon. Quite soon turned in to tonight's dinner :)  I made the kids some GF/DF calzones with sausage, mushrooms, and spinach.  I had planned the same thing (with gluten and dairy) for Jaime and I, but just couldn't get that gorgeous eggplant and cheese picture out of my mind--I could practically taste it!  I've never had breaded and lightly fried eggplant, but I sure could imagine it.  I love it when I have everything on hand to make something I'm craving.  I even still had some fresh-from-our-garden cherry tomatoes that needed to be eaten.  The meal came together super fast and easy.  I did use a different goat cheese--just one that I had on hand.  Another change I made was to not peel the eggplant.  The peel is perfectly fine to eat and didn't impact the flavor or texture at all--keep all your nutrients (in this fried meal!) Also, NEVER put your fresh tomatoes in the fridge (the recipe says to cut them and then refrigerate them while prepping the eggplant. I just cut them while the eggplant was in the oven for the 7 minutes.) Jaime and I both decided this would be a repeat dish.  Give it a try!
Here's mine--I think I should have left it in the oven a little longer to melt the goat cheese more, but we were ready to eat.

Tuesday, November 8, 2011

Stew Sucker

I'm a sucker.  A sucker for stew meat.  Good stew meat.  Several weeks ago I picked up a little over a pound of some on sale, organic, wonderfully cared for and grass fed stew meat.  The meat was beautiful!  Last week I had planned stew for dinner tonight.  Why? Why do I fall for the stew meat? Why do I insist on making stew?  Because I'm a sucker.  I can't make stew.  There, I said it. It's out there forever now.  Let me revise that.  I can't make stew and have it taste any good.  I've tried a few different recipes--herbs, red wine, variety of potatoes, browning the meat, etc.  I typically end up making stew in the crock pot.  It has never tasted good.  One time, Jaime made this incredible stew from a Jacques Pepin recipe.  It was pretty wonderful.  It took a long time.  It was NOT in a crock pot.  Maybe that's my problem.  Maybe I just haven't tried the right recipe.  Anyone out there have a good great crock pot stew recipe?  I know I'm a sucker and I'll probably end up buying some beautiful stew meat again.  I'll need a fantastic recipe. Help me out please, won't you?

Thursday, October 27, 2011

Pancake Muffins

These pancake muffins are ridiculously easy, quick, and so much fun to customize!  They can be made ahead and frozen or enjoyed fresh from the oven.  I made some the night before that were gluten free and dairy free for the kiddos for breakfast in the morning.  Then in the morning I whipped up some regular ones for the hubs and myself.  I can tell you right now, these will be a regular breakfast/snack item for some time to come! :)


Basic Pancake Muffins
Ingredients
1 cup flour
1/2 teaspoon baking powder
1/4 teaspoon coarse salt (use a little less if using regular table salt)
1 egg
3/4 c milk
1.5-2 tablespoons melted butter (could sub oil or applesauce)
Mix-Ins (see below)
Directions
Mix dry ingredients together in a bowl then add the wet ingredients and mix well.  Divide batter between muffin cups (I like using the silicone cups because the muffins pop out so easily. If you use a metal pan, don't use paper liners, just spray with oil.)  Bake at 350 for 15-17 minutes.  Depending on your mix-ins, this makes 9-12 muffins.
Mix-Ins
The list here is endless! Let your imagination and taste buds lead you :)
cooked sausage
cooked bacon
chopped apple
nuts
wheat germ
dried fruit--cherries, cranberries, blueberries, etc.
fresh berries
pumpkin
couple teaspoons sweetener--sugar, honey, brown sugar, agave, etc
vanilla
banana
peanut butter
chocolate chips
spices--cinnamon, nutmeg, cloves, pumpkin pie spice, etc
herbs--basil, thyme, oregano, rosemary
chopped ham
cheese--Oooh, so many cheeses to choose from!

For gluten and dairy free
I used Silvana's all purpose GF flour mix from the Cooking For Isaiah cookbook.  You could likely use any all purpose GF flour mix, just know that they vary in flavor and texture.  Use your favorite.  For dairy free, I used almond milk and Earth Balance DF/GF/SF butter.
For the muffins I made a few nights ago, I used about a 1/3 of a pound of cooked chicken sausage and half of an apple chopped up--the kids LOVED them the next morning with some eggs.

For the more mainstream muffins I made, I used wheatgerm (couple tablespoons), chopped apples (half an apple), cinnamon (about 1 teaspoon), vanilla (1 teaspoon), walnuts (couple small handfuls), and dried cranberries (couple small handfuls).  Two of these babies along with a cappuccino and I was one happy and full mama! :)

Double your recipe and stash some in the freezer for those rushed mornings or those mornings where the kids are up and hungry and you want to stay in bed.  What? I know I'm not the only one ;)
 Inspired by this recipe.

Sunday, October 16, 2011

Another FABULOUS Pizza

Oh my, Friday night I made another incredibly fabulous pizza!  It was a pumpkin pizza with caramelized shallots, mozzarella cheese, arugula, balsamic vinegar, and this simple pumpkin sauce.  While the pizza was cooking I thought that adding some crispy cooked bacon would be pretty tasty on there too.  Jaime said, "Well, yeah, bacon tastes great on everything!"  Next time :)
Unfortunately I didn't get any pictures of the pizza making process or even one of the final baked pizza, just a quick shot of the couple of pieces that were left after Jaime and I finished eating and it turned out to not even really be worthy of putting on here.  Just trust me, this pizza is awesome!
The recipe I started with can be found here.
Pumpkin&Caramelized Shallots Pizza
Ingredients
1 batch bread dough** or pizza crust
6-8 shallots, thinly sliced
2 tablespoons Olive oil
1 15oz can pumpkin puree (NOT pumpkin pie filling)
1 tablespoon fresh rosemary, finely chopped (or 1-2 teaspoons dried rosemary)
2 tablespoons apple cider vinegar
1-2 tablespoons maple syrup
kosher salt
2 cups mozzarella cheese, shredded*
1-2 cups arugula
Balsamic Vinegar Dressing
**if making the bread dough, make dough, let rise 1 hour, then spread it in a rectangle on a greased baking sheet, let rest about 20 minutes.
*to make it dairy free, use Daiya mozzarella cheese. to make it gluten free, you can make/buy a gluten free crust or make individual pizzas on toasted slices of GF bread (did the quick bread trick for the kiddos).
Directions
Heat oven to 450 degrees then bake pizza crust for 3-5 minutes.  While it's baking, heat olive oil in a skillet over medium to medium-low heat, add sliced shallots and stir occasionally.  The shallots will whiten some and then start browning...this is the caramelizing and tastes incredible.  Keep an eye on them and stir so that they don't burn.  This can take 15-20minutes. (Caramelizing the shallots can be done ahead of time if desired.)
In a small pot, combine pumpkin, 1 cup water, apple cider vinegar, maple syrup (I used 2 tablespoons and we decided it was a little too sweet) and rosemary.  Heat to a boil while stirring then reduce heat to simmer for 5-10 minutes.  Remove from heat and set aside to cool a bit.
Spread about half of the pumpkin sauce on the pizza crust, top with the caramelized shallots, then sprinkle the mozzarella cheese on top.
Return pizza to the oven to bake for about 10-12 minutes.  Remove pizza from oven, top with the arugula.  Let cool for a couple of minutes then slice.  Drizzle some of the Balsamic Salad Dressing over individual servings and enjoy.  (Top with cooked bacon too if desired!)
It sounds like this pizza takes a long time, but the shallots don't require much hands on time so get those started then make the sauce and shred the cheese.  It comes together pretty quickly and truly is worth it!
The extra pumpkin sauce can be used on a second pizza or tastes great tossed with pasta, some blue cheese and the Balsamic Vinegar Dressing (and bacon if you have any!)  Yes, Jaime and I had this pasta for lunch yesterday :)
Enjoy!
~Leave me a comment here on the blog and let me know what you think.~


Saturday, October 15, 2011

Balsamic Vinegar

We LOVE  balsamic vinegar here in our home.  It can be savory or sweet, drizzled on salads or over a scoop of vanilla ice cream.  Because making a quick salad dressing is so simple and easy--only 3 ingredients!--I like to keep some on hand.  There are different ways to change it up or add to it, but the following recipe is what I keep ready to go in the fridge.
Balsamic Vinegar Dressing
Ingredients
Dijon mustard
Balsamic vinegar
Olive oil
Directions
Mix all 3 ingredients together (an easy way to do this is place all 3 in a small jar, tighten the lid, and shake.)  Play with the ratios to get the flavor you like best.  This is something that I've never measured, but I'm guessing it's about 1 teaspoon mustard, 2-3 tablespoons balsamic vinegar, and 2-3 tablespoons olive oil.
To fancify this dressing, you can finely dice some onion or shallots to add in along with different herbs.

Reduced Balsamic Vinegar
Pour some balsamic vinegar in a small pot. Stir and bring to a simmer over medium heat.  As it simmers, it will thicken and sweeten (if not sweet enough, add a small amount of sugar).  Cool and store in refrigerator.  Drizzle over ice cream and/or berries.

LinkWithin

Related Posts with Thumbnails