Showing posts with label project. Show all posts

Wednesday, March 28, 2012

Bringing a Bit of Nature Inside with Moss Balls

I've wanted these moss covered balls for so long now.  Today I finally made some, with Penelope's help.  I love the way that they look so simple and bring in some pretty texture and color.  With coupon in hand, the girls and I headed to Michael's this morning to pick up our supplies.
 You'll need some moss, scissors, glue gun and glue, balls.  I used my 40% off coupon to buy the table runner size sheet of moss.  You can buy it this way or buy it loose in bags.
For the balls, you can use Styrofoam, newspaper, beach balls, bouncy balls, etc.  I found a bag of Styrofoam type balls. They are more solid than Styrofoam and the package said they could be cut, painted, glued, and even sanded.  Styrofoam balls are EXPENSIVE!  I recommend either making sure you buy them on sale, with a coupon, or use something else.
To begin making the moss balls, you can spray paint the balls with a dark green so that if any white shows it's not a big deal.  I knew mine would not be viewable that close up, so I didn't paint mine.  Then, since I chose to use the mat moss, I cut a portion off to glue to the ball.  Carefully apply some glue from the glue gun on to the ball then gently press the moss on the glue.  Continue until the ball is completely covered.
Do you see that bit of white showing?  You can always glue more moss on there or paint the balls before putting the moss on them.  I just turned mine so that that side isn't seen--problem solved! :)
I put my moss balls in my apothecary jars.  They look great, but don't photograph well.  I'm working on that!
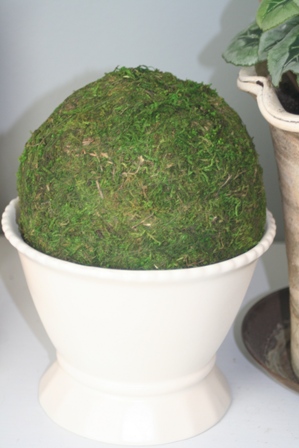
While at Michael's, I purchased 2 of the large moss covered balls.  I did this because the uncovered balls cost the same amount as the moss covered ones.  I had planned on putting one of the large moss balls in the jar with a couple of the smaller ones I made, but the larger one was too big.  I put it back in the bag to return it, but then I found another home for it :)
I put it in this little bowl that I have on a side table with a lamp, but due to poor lighting for the picture I moved it next to some flowers on a different table.
linked up at Momnivore's Dilemma

Monday, March 26, 2012

Toddler Spring Bouquet

Spring has sprung!  I don't know why I never thought about this phrase more until this spring.  We've had warmer than normal weather occur here in Kansas.  Suddenly all the trees had blooms that in a week's worth of time had leaves explode out!  Now instead of sticks for trees we have fluffy green trees everywhere.  It's so rejuvenating and beautiful!  To have some fun with the season and some craft supplies we have on hand, Penelope and I made some flowers.
First, we gathered our supplies.  You'll need an empty egg carton, scissors, and pipe cleaners.


Cut each egg section apart and poke a small hole in the bottom of each section.
Next, thread a pipe cleaner through the hole.  This can get fancy by twirling the inner end of the pipe cleaner or by twisting two or more colored pipe cleaners together and then threading them through the hole.
Finally, the carton flowers can be decorated with markers, stickers, pom-poms, glitter, etc.

Welcome spring!


linked up at Momnivore's Dilemma

Friday, October 28, 2011

Tile Tray

I have wanted to do a tiling project for quite some time now, I just didn't know how to tile--adhesive, grout, spacers, etc.  I'd LOVE to redo my bathroom and kitchen, but I knew I couldn't start with such big projects.  I even had some less than $5 tile picked out for a small project.  Then came along Chris over at Just A Girl with just the perfect beginning small tile project!  I've had a plain wooden tray on my bathroom counter for at least a year or so now to help corral a few items that always sit on the counter.  I wanted to paint it or do something to it, I just never quite knew what and, big picture, it was a project that was low on my to do list.  However, once I saw Chris's tiled tray, I knew that that was the perfect way to begin tiling, finish that boring wooden tray, and add a pretty touch to our master bathroom.  Chris posted a pretty thorough tutorial on how to do this project and I followed it fairly closely.  
First I played with the tile on the tray, including another tray because of the different sizes.  My chosen tile didn't fit perfectly in the tray and I wasn't about to figure out how to cut tile for this little project.  After playing with it, I still couldn't decide, so I went ahead and painted both trays.  Whichever tray I ended up not using I knew would go in the girls' room with their newly painted bookcase. (Their room is slowly coming together.)
After the paint was dry and I finally decided on a tile layout with a tray, I applied the adhesive/grout mix.  This stuff is great and easy to use--a lot like spreading frosting on a cake!  It does take time to set and dry. 
Also, because I was just beginning, I didn't spend money on proper tiling tools (just like Chris).  So, to spread the adhesive stuff I cut a square of the cardboard that the tile came on.  Isn't that tile pretty?
Then the adhesive needs to be scored.  I cut notches in my piece of cardboard.
Next came the fun part of laying the tile.  While deciding on my tile arrangement, I had cut my 12x12 sheet of tile in to strips because it was arranged in an offset pattern that just wouldn't work for me since I wasn't going to be cutting tile.  Working with strips was easy.  Since I was not having to lay individual pieces of tile, I didn't have to worry about spacers and just eyeballed space between each strip.
Then, because the directions on the adhesive/grout stuff says to let it dry for 24-36 hours before using the mixture as a grout, I did.  But I couldn't resist cleaning up the edges some with a damp cloth.
After waiting the designated amount of time, I used a new square of cardboard to spread the layer of grout all over the tile and in between each one.  Again, it isn't too different from icing a cake--with sandy frosting!  (My container of adhesive/grout looks like I barely used any from it.  For just under $8 it goes a LONG way!) I couldn't resist cleaning it up some since I had some chunky pieces of grout.  However, I realized the more I tried cleaning, pieces of it would come out from between the tiles.  So, take it from me, let it dry for the 4 hours it says then wipe it down.  See below how it all came off.
See in that picture above how there's still some chalky film on the tile?  That comes off super easy later after it's dried again for 24 hours.
Here she is all wiped down and shiny on the bathroom counter.
I can hardly believe that picture is just a month shy of being 5 years old! It was taken on our 5 year anniversary.
And because I couldn't resist a little staging...
Don't be afraid to learn something new by doing just a small project.  I still don't think I'm ready to tackle redoing the shower or the kitchen backsplash, but I'm ready and excited to try a bigger project...and I've got a couple in mind!


Thursday, October 13, 2011

Halloween Decor

Typically when it comes to Autumn, I just decorate for the season.  However, yesterday the boys asked if we were going to decorate for Halloween (they still haven't begun discussing what they are going to dress up for Halloween!)  I thought, why not?!  So I hopped on the internet this morning and came across some pretty cute, easy, cheap, and simple decorations that would work for us.  Both of the decor items I created today came from this great blog, Hi Sugarplum! by Cassie.
I've been saving jars--spaghetti sauce, pepperoncini, applesauce, and another small one--for the last several weeks for a different project, but these jars are just right for this quick and festive Halloween decor.
A quick trip to the dollar store for some gauze and I was ready to go!  All you need for this project is
jars, gauze, tape, glue, googly eyes, scissors, and tea lights.
The rolls of gauze from the dollar store came in 2.5 yards/box (I used 2 boxes) and was plenty to cover my 5 jars.  Tape the end of the gauze to the top of the jar and just wrap it around and around until you get to the bottom, then cut and tape.  Use some glue to attach the eyes, let dry, then drop a tea light in the jar.
They are cute, but when they are lit up, they are even cuter! :)
And here's the mantle:
And although the boys asked for a grave (meaning cemetery with tombstones) they love the spiders and mummies.

Sunday, January 9, 2011

Coffee Table

I was given an old coffee table by a friend who got some new furniture to fill her space.  We haven't had a real coffee table at all and haven't really had a need for one. When we did need one, we made due with our over-sized ottoman.  This poor ottoman has most often been used as a trampoline though.  With the kiddos and their endless energy, not having a coffee table has been a blessing.  Not having the coffee table meant having more space to play and spread out.  However, lately we've been playing more board games (usually chess or Monopoly) and I decided a coffee table would be helpful both for storage and table space. To say our sofa is large is an understatement.  I still remember the salesman's line, "This couch is great! If you take the back cushions off it's the size of a twin bed!"  He wasn't kidding. It's huge.  It's ugly.  But it's comfy, we don't care too much if things spill on it or if kids jump on it, and it has come in handy as a bed on a few occasions.  So for now and until we have cash to buy a nice new one, it's what we've got.  Back to my new coffee table.  It was dated, but large and fit the scale of the sofa.  The table has some perfect storage for all our games and even space for baskets of books.
  

All I have left to do is put a couple coats of sealer on the top.  This project has taken MUCH longer than I had planned.  Lots of sanding and stripping.  Pictures to come!

Wednesday, May 26, 2010

Window Box How-to

 Have you ever wanted to add a window box under your windows?  I have! They look so gorgeous overflowing with flowers. 


I saw a link over on Just A Girl for a place called Hooks and Lattice and fell in love. I even ordered a free catalog to peruse.  Oh my, they are pricey!  Then, I found this little tutorial over on How Does She.  She even gives the prices of the materials needed...the entire project was under $5!  Now, that I can afford and it looks like a simple enough project to start and complete.  Check it out and add instant curb appeal.
Picture sources:
http://z.about.com/d/landscaping/1/0/-/I/purple_orange_window_box.jpg
http://sydandgoose.typepad.com/syd_and_goose/images/2007/04/09/12_60_77_web.jpg

Tuesday, May 25, 2010

Extra Practice Never Hurt

My guys do a pretty decent job when it comes to brushing and flossing their teeth. I'm proud to say that there are no cavities so far in their little mouths.  Sometimes, however, this twice-a-day routine can get dull.  And a hot summer is just about here (tomorrow at 10:30 it officially starts for us!)  I need some fun activities for all 3 kiddos.  I came across this awesome idea (some people are just pure creative genius!) and I know we'll be doing this one for sure.
Don't forget to brush and floss when this fun time is done :)

Thursday, April 22, 2010

Earth Day 2010

I don't normally get into Earth Day, but this year I did :)  Last night I saw this fun blog, Bloom, and on there I found this cute tin can pot and knew I had to do that too.  So this morning (going totally off of just seeing the picture on Bloom and not reading the craft instructions on the other site) I grabbed a can from the recycling box, put some fresh soil in it, cut some herbs from the garden, sprinkled in some water, snapped a picture and called it done.  :) I know the can needs some holes poked in the bottom and a layer of small rocks under the soil, but I was also thinking that these cuttings would be transplanted by a friend in to her garden, so I skipped those steps.  I'm thinking a set of these would be charming on a pretty windowsill (of course with a plate underneath).
 The picture was taken right after I planted it.  The oregano has since perked back up and all 3 herbs look great. :)  Now picture these with some colorful little flowers in there too....  Makes me happy!


Monday, March 1, 2010

Not your everyday floral wreath

What a great way to use the yoyos I make.  Katie at Paisley and Polka Dots wrapped a foam ring and covered it with her flower yoyos.  I can do that!  Such a simple and fun project, not to mention one that will brighten up a room and make it feel more like March and springtime :)  Create yoyos for any season or color scheme.  Follow her tutorial for your wreath making.


Crepe Paper Rose Balls

Guess what will be in my check out basket soon...crepe paper!  :)  I found these super cute decorative balls and know that they will be a perfect addition to Penelope's room.  House of Smiths has the perfect tutorial to help you create these too.  Go check it out and glam up a little corner.


Monday, February 1, 2010

Last week's crafts

Two out of the three crafts I did last week got the reject vote from the judge in my home.  I like 2 of the 3 and am playing with the one I don't care for to make it something that I do like.  Here are pics of the 3 crafts and I'll let you be the judge.
 Ribbon Ring


 Fabric Coasters (the mod podge on them in this picture is still drying)

 
 Twine-wrapped frame

Go ahead, leave honest comments, I can take it, I promise :)


LinkWithin

Related Posts with Thumbnails