Showing posts with label baking. Show all posts

Thursday, May 31, 2012

Pineapple Macadamia Nut Macaroons

Oh my, these are delicious!  Last week I gave you a little tease about them...eating one conjures thoughts of a tropical vacation. :)  If you like sweet, soft coconut, sweet yet tangy pineapple, and little bits of chocolate and crunchy macadamia nuts, then you will LOVE these cookies.
These Pineapple Macadamia Nut Snackaroons are made by a company called Laughing Giraffe Organics.  They make several different varieties of Snackaroons--Vanilla Almond, Cranberry Orange, and Cherry Ginger to name a few.  They can be bought online via their website or you can pick them up at Whole Foods like I did.*
They are definitely a treat, but they are a healthy choice (though you can hardly tell!) On top of being organic, they are raw, vegan, gluten free, and hand crafted...see, it says right on the front of the package. 
And on the back it tells more about the production facility and also states that Laughing Giraffe Organics are "an independent family run business and (they) greatly appreciate your support."  My mouth is more than happy that I support them :) 
On the back of the package, Laughing Giraffe Organics tells more about their ingredients and their rich nutritional value and how the snackaroons will satisfy your hunger with less and be better than empty calorie consumption.  All their claims are true, but eating just one is hard because they are so delicious!
*As much as I wish I were compensated for this post with a few samples, I haven't been. Maybe one day I'll have some to share.  :)

Wednesday, May 16, 2012

Microwave Free (Part 2)

I'm gaining confidence in our ability to be microwave free.  Let me explain WHY we decided to go this route.  In recent years I'd started wondering how safe our microwave was (it's from 2000), what was it doing to the nutritional content of our food, wondering how our plates could get excruciatingly hot while our food that was on them still be so disappointingly cold, and wishing for more counter space. Kitchen Stewardship did some extensive research here and here and sourced it all to help in reading the research a little faster.  My 2 biggest concerns regarding our microwave use were the safety of it--leaking radiation--and nutritional value.  Since the kids, especially Penelope, love to be independent and heat up their own food and stand practically with noses touching the door while it's on I figured I'd better determine this safety.  While pregnant with Stella I always moved away from the microwave when it was on.  Have any of you done this or do you stand and watch the food spin around?  I started wondering about any lingering radiation when I popped open the door as soon as it dinged ready.  So, I'd let several seconds and sometimes minutes pass...umm, whatever was heated up was then cold again.  And so it got heated up again.  Then I'd have to go change a diaper, settle a dispute, nurse a baby, and then eventually get back to the microwave that patiently flashed END over and over and held my yet again cold food/coffee.  Are you getting a sense of the cycle here?!  Regardless if microwaves are good/bad I was continually pushing the minute plus button and never getting to the food/drink within.  Frustrating!  After 3 days of making myself microwave free, I've managed to focus on heating my food and enjoying it while hot. :)  So, why did we go microwave free?  It forces me to be more intentional in my heating up and eating food, if there's a chance that microwaved food could be less nutritious, then why not skip the microwave?  The kids have lost a bit of their independence in the kitchen, but this summer I'm looking forward to teaching them how to use the toaster oven safely.  I recommend you check out at least the 2 posts linked here to Kitchen Stewardship for some great info on the microwave topic.

Tuesday, May 15, 2012

Microwave Free? (Part 1)

We've decided, after much thought, some research via Kitchen Stewardship, and even a couple Facebook inquiries, to get rid of our microwave. Okay, it's sitting on the floor waiting for me to decide whether to donate it or finish moving it down to the basement.  In it's place sits a brand new Breville Convection Toaster Oven.
Source
I also bought a small butter warmer pot to heat small amounts of things that I would have done in the microwave.  Even though these items were purchased over the Mother's Day weekend and even though they are pretty sweet, I declared them semi-necessary household items and they were not to be called mother's day gifts.  (Instead we had a wonderful homemade family meal...some even baked in the new toaster oven.)
Part 2--Why we decided to try being microwave free

Sunday, November 20, 2011

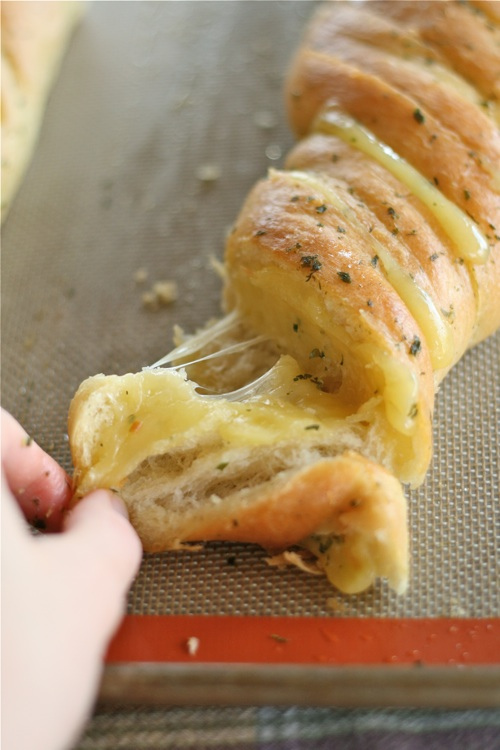
Garlic Cheesy Herb Bread

Last night I made this incredibly delicious garlic herb cheesy bread.  I got the idea from this recipe, but used my own bread recipe and made a few other changes. 
Just look at this awesome yummy bread!
source  
I tell you this bread was so what I've been craving (along with the jalapeno poppers my dear husband picked up for me.)
To make it yourself, just make up a batch of bread dough (or you could even thaw out some of that Rhodes dough, but making your own really is simple and quick).  Let the dough rise for an hour then separate in to 2 equal parts.  Form the dough in to 2 baguette shaped loaves.  Let loaves rest about 10-20 minutes while the oven heats up.  Bake the 2 loaves at 375 for 15 minutes.  Then, while the loaves cool some, melt about a 1/4 cup of butter in the microwave.  Add some Italian seasoning and garlic powder to the butter. Thinly slice some cheese.  I used mozzarella.  Use a bread knife to slice about 3/4 of the way through the bread. 
source
Next spoon or brush that melted butter mix over the top and in between the slices of the bread.  Then, slide the slices of cheese in between the slices of bread.  Put the bread back in the oven (I lowered the temp to 350) for about 5-7 minutes to melt all that cheese.  Try to resist immediately eating slice after slice of buttery, cheesy, herby, garlic bread.  Let it cool for a few minutes so you don't burn your tongue...seriously.  Then just pull off a couple of slices and indulge.  You can even heat up some marinara sauce to dip it in. 
Enjoy!

Thursday, October 27, 2011

Pancake Muffins

These pancake muffins are ridiculously easy, quick, and so much fun to customize!  They can be made ahead and frozen or enjoyed fresh from the oven.  I made some the night before that were gluten free and dairy free for the kiddos for breakfast in the morning.  Then in the morning I whipped up some regular ones for the hubs and myself.  I can tell you right now, these will be a regular breakfast/snack item for some time to come! :)


Basic Pancake Muffins
Ingredients
1 cup flour
1/2 teaspoon baking powder
1/4 teaspoon coarse salt (use a little less if using regular table salt)
1 egg
3/4 c milk
1.5-2 tablespoons melted butter (could sub oil or applesauce)
Mix-Ins (see below)
Directions
Mix dry ingredients together in a bowl then add the wet ingredients and mix well.  Divide batter between muffin cups (I like using the silicone cups because the muffins pop out so easily. If you use a metal pan, don't use paper liners, just spray with oil.)  Bake at 350 for 15-17 minutes.  Depending on your mix-ins, this makes 9-12 muffins.
Mix-Ins
The list here is endless! Let your imagination and taste buds lead you :)
cooked sausage
cooked bacon
chopped apple
nuts
wheat germ
dried fruit--cherries, cranberries, blueberries, etc.
fresh berries
pumpkin
couple teaspoons sweetener--sugar, honey, brown sugar, agave, etc
vanilla
banana
peanut butter
chocolate chips
spices--cinnamon, nutmeg, cloves, pumpkin pie spice, etc
herbs--basil, thyme, oregano, rosemary
chopped ham
cheese--Oooh, so many cheeses to choose from!

For gluten and dairy free
I used Silvana's all purpose GF flour mix from the Cooking For Isaiah cookbook.  You could likely use any all purpose GF flour mix, just know that they vary in flavor and texture.  Use your favorite.  For dairy free, I used almond milk and Earth Balance DF/GF/SF butter.
For the muffins I made a few nights ago, I used about a 1/3 of a pound of cooked chicken sausage and half of an apple chopped up--the kids LOVED them the next morning with some eggs.

For the more mainstream muffins I made, I used wheatgerm (couple tablespoons), chopped apples (half an apple), cinnamon (about 1 teaspoon), vanilla (1 teaspoon), walnuts (couple small handfuls), and dried cranberries (couple small handfuls).  Two of these babies along with a cappuccino and I was one happy and full mama! :)

Double your recipe and stash some in the freezer for those rushed mornings or those mornings where the kids are up and hungry and you want to stay in bed.  What? I know I'm not the only one ;)
 Inspired by this recipe.

Sunday, October 2, 2011

Cupcakes for 2

Oh my!  Pinterest has led to something too good!  Usually I pin so many different food things thinking maybe one day I'll try them.  I've got many many sweet treats pinned that most likely I won't ever make for the fear of eating it all by myself.  Recently though I found a Cupcakes for 2 pin and thought that that sounded pretty reasonable.  Last night I gave the recipe a shot...and doubled it :)  These cupcakes are super easy and fast.  What's great is that they can be made in one bowl with a spoon--nothing fancy needed!  Simple cooking and little cleaning, that's cooking I like.

I did make a little change to the recipe because I didn't want to waste any egg. Since I decided to double the recipe to make 4 cupcakes, I used a whole egg instead of just the egg white.  I also baked mine in silicone cups.  The other difference was that it took 2 minutes longer to bake than the time stated.  I just made sure to check them with a toothpick.


One Bowl Vanilla Cupcakes for Two
serves 2
1 egg white
2 tablespoons sugar
2 tablespoons butter, melted
1 teaspoon vanilla (yes, a full teaspoon – they are super vanilla-y!)
1/4 cup flour
1/4 heaping teaspoon of baking powder
pinch of salt
1 1/2 tablespoons milk
Preheat oven to 350 degrees. Line a muffin pan with 2 liners.
In a bowl, add egg white and sugar and whisk until combined. Add in vanilla and melted butter and stir until mixed. Add flour, baking powder and salt and stir until smooth. Stir in milk. Divide batter equally between the 2 cupcake liners.
Bake at 350 for 10-12 minutes, or until cake is set. Let cool completely, then frost as desired.

Source
Just look at those beauties!  I know you want to make some too :)  Another great things about this simple recipe is that it's versatile.  Add chocolate, Nutella, nuts, fruit, etc--check out the original posting site for more ideas and icing recipes. 
Enjoy!

Friday, September 23, 2011

Cherry Cream Cheese Rolls

This week I wanted something just a little sweet to munch on.  I took my inspiration from my other rolls and created my Cherry Cream Cheese Rolls.  YUM!  While it cooked, the house smelled so delicious, slightly cinnamon-y and sweet.  On a cool morning with a cup of coffee, these are perfect!  My husband enjoyed some after work and for dessert.
Cherry Cream Cheese Rolls
Ingredients
Bread dough (I used a half of my bread recipe*)
about 1/2 cup dried cherries
2-4 oz cream cheese
some cinnamon sugar or just cinnamon
fresh lemon zest from about a 1/4 of a lemon

How To
On a cookie sheet, use your hands to spread dough out in a rectangle.
Then drop chunks of cream cheese on top of the dough.  I spread mine out some using a knife.  A spatula would work too.
Sprinkle some cinnamon or cinnamon sugar over the entire area.
Next, sprinkle the dried cherries all over the top.
Then use a zester or a fine grater to zest some lemon over the top.  I only had about a quarter of a lemon and this amount worked just fine.  It was enough to give the roll a little zip.
Next, start at the widest end and roll the bread up.  Slightly pinch the end to seal it to the roll.
This time, I baked the roll whole like this instead of cutting it up.  I did cut a couple of small slashes in top of the roll. It turned out beautifully.  If you prefer a darker crustier finish, now would be the time to beat an egg and brush it over the top and sides of the roll.
Bake at 375 for 12-15 minutes.
Let cool slightly then slice in to serving size rolls.
Enjoy!*When I make my bread dough, some times after the first rise of 1 hour I will split the dough in half and put each half in a baggie and freeze it.  This way I always have some dough on hand.  Just take it out of the freezer and let thaw either over night in the fridge or for a couple hours on the counter.  Once thawed, it is ready to use.

Sunday, September 4, 2011

Weekly Menu

With the forecasted cooler temperatures this week, I'm really getting in the mood for Autumn.  Penelope and I did some fall decorating on Friday and lit a spicy fall candle.  I've had it burning ever since.  Last night I made some cinnamon rolls that I baked up this morning--so delicious and Autumny!  While grocery shopping yesterday, I picked up some pumpkin and organic semi-local apples for baking some pancakes and muffins. 
Any Fall cooking this week for you?

Saturday--Roasted Beef and Mushroom Soup with Rice and Thyme adapted from Everyday Food magazine October 2010 issue
Sunday--Grilled Salmon with garlic and capers, Brown rice, Jalapeno Poppers--cream cheese and  bacon, Green Salad
Monday--Pumpkin Dumplings from Cooking For Isaiah and roasted chicken legs
Tuesday--Thai Peanut Noodles with (left over) chicken
Wednesday--Momnivore's Caramelized Chicken Noodle Soup
Thursday--Adapted Rockin' Italian-Style Meatloaf, Baked Potatoes, Green Salad with balsamic vinaigrette
Friday--Quinoa with Zucchini and Ground beef and such

Thursday, August 25, 2011

Baking Bread and Saving Cash

I have fallen in love with baking my own bread again.  I found a fairly simple bread recipe and then turned it in to the simplest, most versatile, quick, no fancy machines required bread recipe.  With my recipe, I have made french bread, calzones, and dinner rolls.  I have no doubt that this bread could also be used as pizza crust, sandwich bread, sweet bread--monkey bread, cinnamon rolls, etc.
All you need to make this bread, is a bowl, a spoon, a 1 cup measuring cup, a 1/2 teaspoon measuring spoon, piece of plastic wrap, a baking sheet, and an oven.
Ingredients
1 1/2 teaspoons yeast
2 teaspoons sugar
1 1/4 cup warm-hot water
1 teaspoon salt (I've forgotten to add this on occasion and it still turns out well)
3 1/2 cups flour+about 1-2 tablespoons for the baking sheet (I use King Arthur All Purpose flour)
1-2 tablespoons olive oil (I don't measure this, just pour some in)
How To
In a large bowl add the yeast and sugar (the yeast feeds on the sugar--my kids LOVE watching this) and the warm-hot water.  Stir it around a bit and let it sit for 3-10 minutes.

Next add the flour and salt and some olive oil. 

Use that spoon again to mix it all up.  I don't use the spoon too long, just to start pulling it all together. 

Then use your hands to mix/knead the dough in the bowl for a minute or so. Form a large ball with the dough.
 At this point you can either spray the ball with some olive oil or brush some olive oil on using your hands. Then take your piece of plastic wrap and cover the top of the bowl.
Now leave the bowl in a warm spot for about an hour.  I stick mine in the oven with the light on.  Take a minute to wash your spoon, measuring cup, and measuring spoon, then prep your baking pan--just toss a bit of flour on there and shake it around. 
This pan has too much flour on it, but it was also the second time for me to use it to bake the bread that day.
 Then read a magazine, fold a couple loads of laundry, pick the kids up from school, prep dinner--you know, however you want to spend an hour. Then after an hour check out our bread dough...
It has pretty much doubled in size.  Also, smell that yumminess!  DON'T THROW AWAY YOUR PLASTIC, just fold it in half so you can use it again in a few minutes. Now you have to decide what you want to make with your bread dough.  This time I made 2 French loaves that we cut in half for meatball subs.
Divide the dough in two (if making rolls, this dough makes 12-15 dinner rolls) and stretch it out and dust it with a bit of flour from the pan.  Then loosely roll each loaf piece and tuck the seam under the bottom.
If you want to be fancy, cut a few slashes in the top of each loaf, and brush with a beaten egg to have the bread brown up during the cooking.  I don't do this because I like to use my eggs for other things--scrambled eggs, french toast, omelettes, other baking.
Cover the loaves (I don't always do this covering step) with your piece of plastic (I do save my plastic folded in 1/4s so that I can reuse it several times since for me it never touches the dough).  Let the dough rise on the baking sheet on the counter a second time.  This time though the rise time is only 20 minutes.  I don't always let it rise for the full 20 minutes and it still turns out just fine.
While the bread is going through this second rise, heat the oven to 375.  Bake the loaves for 20 minutes.  I cook the smaller dinner rolls for 15-17 minutes and the calzones for 20-22 minutes.  Just watch your bread.
These loaves are a little light, but I needed to go pick the boys up from school.  What I did to brown them up some was turn the oven off and put them back in while I was gone.  They turned out beautifully and tasted fabulous.
This bread is so cheap and easy to throw together and as a bonus it is dairy free! (I'll have to play with it to see if I can make it gluten free too.)  Give it a try.

Tuesday, August 16, 2011

Blueberry Muffins

Since tomorrow is the first day of school, I've been busy yet again baking and prepping food for the busy mornings with starving (their word, not mine!) boys and to quickly pack healthy filling lunches. Today I've made gluten free and dairy free blueberry muffins (again), rice pudding, French bread, and meatballs.  Okay, so the meat balls are also for dinner tonight for meatball subs, but the leftover ones also make a great lunch!  Since John Paul and Penelope finished off ALL of the granola I made last week, I'm going to have to make more along with some regular granola.  Still to make tonight are some dairy free waffles for Alexander and some gluten and dairy free pancakes.

The GF/DF blueberry muffins are SO good and easy.  The recipe I use is a variation of these Berry-blue-Blueberry Muffins.  I'm so happy to have found this recipe and that it is a family favorite.  I plan on playing with it some more and changing up the berries as well as trying it with some pumpkin or sweet potato for the autumn.

Blue Berry Muffins***
about 2 cups of blueberries (I used frozen ones that we picked earlier this summer)
2 cups all purpose GF flour (I use Silvana's blend from the Cooking for Isaiah cookbook--LOVE this blend!)
1-2 tablespoons GF flour
2/3 cup sugar (I don't always use this much)
1 tablespoon baking powder
1 teaspoon baking soda
1/4 teaspoon salt
1/2 cup almond milk (if I use vanilla almond milk then I don't add as much sugar)
1/2 cup applesauce
2 eggs
some vanilla depending on which almond milk I used


How To
Put the blueberries in a smallish bowl/measuring cup and dump the 1-2 tablespoons of flour over them.  Gently tap the sides of the bowl to knock the flour to the bottom.
In a medium bowl, put the 2 cups flour, sugar, baking powder, soda, and salt.  Mix together.  Then add the milk, applesauce, eggs, and vanilla.  Mix all together. Then add the blueberries and stir them in.
Heat oven to 350.  Grease your muffin tins.  This batter makes 12 regular sized muffins and 24 mini muffins--a fantastic amount!  I bake them at the same time for 10-12 minutes, take the mini muffins out, and let the regular sized ones bake 7 minutes or so.
This morning I forgot the eggs until I had measured about half of the muffins out!  I just dumped it all back in the bowl, mixed up the eggs with a bit of milk, poured it in the batter bowl, and mixed it all in.  They still turned out great! :)

They were super good with my berry spinach smoothie!
***If you don't need/want to make these gluten free then just use regular all purpose flour.  If you don't need/want these to be dairy free then use regular milk.


Friday, August 12, 2011

Almond Butter

As mentioned before, I'm frugal and when it comes to buying or making nut butters, there's PLENTY of money to be saved when making your own, not to mention that you can make them healthier too.  This week I made 2 types of almond butter--regular (or plain as my kids call it) and chocolate.  Both start out the same, both are gluten and dairy free, both are SUPER easy, and both are pretty darn tasty!
Start buy buying raw almonds.  I get mine at Whole Foods in the bulk section.  FYI--they are really on sale this week, as in $2 off/pound!
Almond Butter
Ingredients
raw almonds
a bit of salt
some oil (I used both extra virgin olive oil and some Earth Balance coconut spread)
How To
Roast your almonds (for this batch I used about 3 cups of almonds) on a baking sheet for about 20 minutes at 400 degrees.  Keep an eye on them and give them a little stir half way through.  This step is not necessary, but it adds some great flavor!
Remove almonds from oven and either let cool on the pan or pour into your food processor and let cool some there.  Be careful, these nuts are HOT!
After some time, whiz them around in the food processor with a bit of salt (I always use Kosher salt--the bigger pieces of salt--instead of table salt, just personal preference) to start chopping them up. 
In this picture they are course ground.  If you keep going and don't add any fat, you'll have almond flour.  However, today I'm making almond butter so I keep going and add the fat.  I added a few tablespoons (sorry I just poured it in and eyeballed the amount) of EVOO.  It was still pretty thick and I was beginning to run out of EVOO so I thought I'd try adding the coconut spread.  It worked great.  Since my nuts were still warm, it just kinda melted right in when I turned the processor back on.
See how it's beginning to look like almond butter?  I dare you not to try some at this point!  It was so yummy when it was warm.  You can keep adding the fat until you get a desired consistency.  I keep our almond butter in the fridge, so it thickens more in there.  I just stick some of it in the microwave to soften it a bit before spreading on bread.

Chocolate Almond Butter
Follow same recipe as above, but mix in some cocoa powder toward the end.  When I made ours this time I just stirred in the cocoa powder in the jar.  Just taste it a bit as you go and add more cocoa powder until desired flavor.
The 3 cups of almonds made 1 1/2  jars of almond butter.


Honey Almond Butter
Follow almond butter recipe, but add in some honey.  Easy!

Of course a sweetener can be added to any of these, but since a favorite sandwich in our home is almond butter with honey and cinnamon, I don't add any sweetener (honey, agave, sugar, molasses) to my butters when making them.
Almond butter can be used to make sandwiches, used in smoothies, enjoyed by the spoonful, cookies (replace the peanut butter with the almond butter), etc.  So good!  Also, almonds are a good source of calcium.
Enjoy!

Super Easy Homemade Foods

This week I've been doing plenty of cooking.  I think I was inspired by the prospect of school starting for the boys next week and knowing that they eat MASSIVE amounts of food especially at breakfast.  Because I'm cheap frugal I refuse to spend half of Jaime's paycheck on pre-made foods that I can easily make at home.  Seriously, $6 for about 2 cups of GF granola!? Crazy!  Anyway, I'd been promising John Paul that I'd make him some granola and when I saw Whole Foods had the GF oats on sale this week I grabbed a couple of bags.  I also make non-GF granola for myself, Jaime, and Alexander, but this was a special batch.  The breakfast foods made this week along with the granola, were almond butter and chocolate almond butter, and gluten free and dairy free blueberry muffins. 
So, first up is the Gluten free Dairy free Granola:

What I like about cooking is that you can substitute ingredients.  These are what I used, but change it up for your needs and flavor likings.
INGREDIENTS
about 3 cups GF slow cook oats
couple of handfuls of chopped walnuts (use any nuts or seeds or none at all)
sunflower seeds
couple pinches of salt
several shakes of cinnamon
a few dashes of cloves
oh about 1/4 to a 1/3 of a cup of molasses
somewhere around a 1/3 cup of honey (can use agave or brown sugar as a sweetener too or instead of)
a few tablespoons or so of butter of some sort (this time I used some coconut butter that Jaime bought a while back when it was on sale)
vanilla extract (optional and can sub almond or orange extract)
HOW TO
Because I do all of the dish washing here, I like to use as few dishes as possible and keep a pretty clean kitchen as I go along.  Keeping that in mind, you can use as many dishes, pots, pans, and spoons as you wish. :)
Heat oven to 400.
First pour the oats on to a baking sheet (or you could use a 9x13 probably) then add the nuts and seeds and salt. 

Because the walnuts are fairly soft and I don't want to spend my day standing and doing dishes, I just somewhat crush them in my hands. 
In a glass dish (or if you want to use your stove top, use a pot) combine some butter--a few tablespoons I suppose--some honey, molasses, cinnamon, and cloves.  Then melt in the microwave or in your pot.  FYI--this coconut butter melts SUPER FAST!
It looks kinda gross up there, but I just pulled the melted mixture from the microwave and didn't stir it yet.
Take this sweetened mixture and pour it over the oats, nuts, and seeds.
Mix it all together so that the oats are coated.
Is it becoming painfully obvious that I really need to take some photo lessons from here or here?!
Then stick your pan in the oven for about 30-40 minutes, stirring once or twice during cooking.  Let cool completely before storing in a container in the pantry.
You noticed that there isn't any fruit in here.... Well, I like to mix things up a bit and my 2 GF eaters can't agree on what they both like.  So, when I serve granola I also add some sort of fruit, usually dried, to it as well.  You can add fresh fruit too.  They also like to add their GF crispy rice to the granola and pour almond milk over the top or eat it with dairy free yogurt.
Enjoy!
The almond butters and muffins will come later today hopefully :)

LinkWithin

Related Posts with Thumbnails